
 Français
 English

I made a little guide for you in order to implement Facebook Login to Ionic application !

Before starting this guide, please note that this one is made with the following configuration:
- Ionic 3.9.2
- Angular 4.1.3
- Windows system
- Android platform
I let you adapt this guide according to your configuration. ")
So more, screenshots are taken with the french version of the tools. So, sometimes, maybe the english term is not appropriate. Please notify me about every mistake.
1. Make the Facebook app
Facebook Login will use an app Facebook that you must create beforehand.
For this, go to Facebook developpers user interface: https://developers.facebook.com/
At the top on the right, in My apps, click on Add an app.

Follow instructions. When created, go to dashboard of this app.

Please save the App ID and App Name at the top on the left which will help you bellow of the guide!
2. Start the Ionic app development
Please start an Ionic app with the following command:
ionic start MyApp blankThis command require that your environment for Ionic app is installed (NodeJS, Ionic and Cordova package, Android Studio SDK and the JDK (Java Development Kit).
If you execute the command ionic serve --lab, you will get the following view:

If you read the Facebook recommendations carefully, you will:
- Use the Facebook Javascript SDK (For Web App)
- Use the Facebook for Android or IOS or other platforms SDK
In our case, we will use neither but a [plugin] (https://ionicframework.com/docs/native/facebook/) provided by Cordova and implemented by Ionic.
In the directory of the Ionic app, execute the following commands (By adapting them to your configuration ):
ionic cordova platform add android
ionic cordova plugin add cordova-plugin-facebook4 --variable APP_ID="123456789" --variable APP_NAME="MyApp" --save
npm install --save @ionic-native/facebook
You must notice that the App ID and App Name will be defined here. These commands install the Facebook plugin of Cordova and the Facebook Ionic package.
The
--saveat the end of the command will avoid to have an error "plugin_not_installed" while you deploy your app in device.
3. Update the Facebook App
When the plugin Facebook is installed, open the file config.xml.
You get the following result:

Save the ID of the tag <widget> usefull for the Facebook App.
You can modify this ID name by yours.
In the dashboard of Facebook App, in Parameters > **General*, click on Add a platform**.
Choose your platform (For me, Android ).
Copy the ID of the tag <widget> in Google Play package name field:
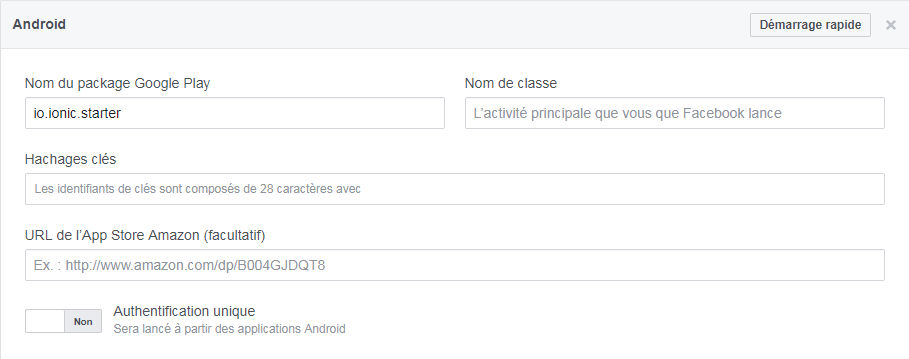
If you define a different ID that
io.ionic.starter, a message appears and notice you that Facebook does not find the package in the store. But you can accept the name.
4. Generate the Hash key for developement (Android only)
If you use another platform that Android on another system that Windows, you can skip this chapter.
To authentificate your app, Facebook will need the Hash key for Ionic App in development. You should generate it. 
If you don't have openSSL, you must install it. For this:
- Get a version of openSSL according to your system with this link: https://code.google.com/archive/p/openssl-for-windows/downloads. (Users of Windows 64bits must download the version openssl-0.9.8e X64, not the lastest)
- Unzip the content in a directory
- Add the path to
binof this directory in the system PATH (likepath\openssl-0.9.8e_X64\bin)
Locate the tool keytool in the JDK directories (For instance C:\Program Files\Java\jdk1.8.0_131\bin\keytool.exe)
Open a new terminal, go to C:\ then execute the following command:
"C:\Program Files\Java\jdk1.8.0_131\bin\keytool.exe" -exportcert -alias androiddebugkey -keystore %HOMEPATH%\.android\debug.keystore | openssl sha1 -binary | openssl base64When the password is asked, put "android".
You can now define the field Hashes keys in the parameters of Facebook App.
5. Develop its application
Now, you are ready to implement Facebook Login in your Ionic App.
You can start to import the Facebook module in Ionic App. In app.module.ts:
// src/app/app.module.ts
...
import { Facebook } from "@ionic-native/facebook";

@NgModule({
  ...
  providers: [
    ...
    Facebook
  ],
Then, create a Facebook Service provider. In facebook-service.ts:
// src/providers/facebook-service.ts

import { Injectable } from '@angular/core';
import { Facebook } from "@ionic-native/facebook";

@Injectable()
export class FacebookService {

  session: any;

  constructor (public facebook: Facebook) {}

  login(){
    //We ask the following permissions: email
    this.facebook.login(['email']).then((response)=>{
      if(response.status === "connected"){
        this.session = response;
        console.log(this.session);
      }
    }, (error)=>{console.log(error);});
  }
}
Don't forget to define this provider in
app.module.ts
In the file home.ts:
// src/pages/home/home.ts

import { Component } from '@angular/core';
import { FacebookService } from "../../providers/facebook-service";

@Component({
  selector: 'page-home',
  templateUrl: 'home.html'
})
export class HomePage {

  constructor(public facebook: FacebookService) {  }

  fbLogin() {
    this.facebook.login();
  }

}
In the file home.html:
<!-- src/pages/home/home.html -->

<ion-header>
  <ion-navbar>
    <ion-title>
      Ionic Blank
    </ion-title>
  </ion-navbar>
</ion-header>

<ion-content padding>
  <button ion-button full (click)="fbLogin()">Connect with facebook</button>
</ion-content>
The code above display the session informations from Facebook. In order to test your code, execute the command ionic cordova run android because the service serve will not allow you to instanciate the Facebook plugin of Cordova.

Now, you can connect with Facebook and can get informations from Graph API of Facebook.
In facebook-service.ts:
// src/providers/facebook-service.ts

...
import { Observable } from 'rxjs/Observable';

...
  login(){
    //We return an observable to manage the asynchronous response
    return Observable.create(observer => {
      this.facebook.login(['email']).then((response) => {
        if (response.status === "connected") {
          this.session = response;
          observer.next(true);        //We return true or false according the connection status
          observer.complete();
        } else {
          observer.next(false);
          observer.complete();
        }
      }, (error) => {
        console.log(error);
      });
    });
  }

  getProfile(){ // New method to return an observable with profile informations
    return Observable.create(observer => {
      if(this.session.status === "connected"){
        this.facebook.api("/me?fields=name,picture", ["public_profile"]).then((response)=>{
          console.log(response);
          observer.next(response);    //We return the Facebook response with the fields name and picture
          observer.complete();
        },(error) => {
          console.log(error) });
      } else {
        observer.next(undefined);
        observer.complete();
      }
    });
  }
In the file home.ts:
// src/pages/home/home.ts

...
export class HomePage {

  userProfile: any;    //This object will contain the profile informations
  ...

  fbLogin() {
    this.facebook.login().subscribe((connected)=>{   //We watch the observable to get connection status
      if(connected === true){
        this.facebook.getProfile().subscribe((profile)=>{   //If connected, we retrieve the profile
          this.userProfile = profile;
        }, (error)=>{console.log(error);});
      }
    }, (error)=>{console.log(error);});
  }

}
In the file home.html:
<!-- src/pages/home/home.html -->

...

<ion-content padding>
  ...
  <ion-card *ngIf="userProfile">
    <img src="{{userProfile.picture.data.url}}" >
    <p>{{userProfile.name}}</p>
  </ion-card>
</ion-content>
After testing the Ionic App, you obtain the following result:

The URL of your profile picture will be in userProfile.picture.data.url. You can check it through the object shown in console.
If you want to use others Facebook fields or permissions, you have the following list.
Source code of this guide is available on Github: https://github.com/clemdesign/ionic-3-facebook-login-sample
That's all for this guide.
See you for the next article. 
Add a comment